

Most of us are aware of standing desks and the major benefits they offer, so why not make our very own custom computer desk with electronic waste? Reusing electronic waste is a fun way to promote creativity and can also help us to lower our carbon footprint. Proudly sponsored by Progressive Desk, Loren Browman’s DIY adjustable standing desk uses a tabletop made with old circuit boards encased in epoxy for a unique style that also helps to reduce our environmental impact. If you were thinking of making a custom tabletop and needed some inspiration, this is just the article for you! We will go over the details and products used in creating Loren’s DREAM DESK to better understand what it takes to make custom computer desks like these come to life.
Assembling The Base

After previously working on the pinball table project with our sister company Progressive Automations, Loren was really impressed with the quality and performance of our electric actuators. Since this project needed a standing desk base under his custom tabletop, he decided to give our black Solo Ryzer frame a try. Our user manual and assembly video of the Solo Ryzer frame cover all the details on how to fully assemble the frame step-by-step. Since Loren estimates that the parts that the frame will lift weighs around 130 lb, the 270 lb weight capacity rating of the Solo Ryzer frame will be more than adequate for his needs. Our frame also incorporates a wedge design to help reduce the amount of wobble when the desk is fully raised. Loren also likes the great features offered in our Solo Ryzer frames such as its collision detection and four memory preset positions.
Rough Cuts

After planning his design in Fusions 360, Loren then proceeds with doing rough cuts of Baltic birch plywood and Walnut for making his custom computer desk. He also drills holes around the wooden structures that will later require dowels and sands the rough wooden edges using sanding paper.

All the pieces for the wooden frame were aligned using his JessEm doweling jig before being glued together.
Assembling The Wooden Structure

Once all the wooden pieces have been cut into shape, Loren then assembles them together. He also glues them together while ensuring all the pieces are secured with the use of multiple F clamps.

The desk’s radius corners of this build were made and covered in Loren’s previous video.

Loren uses black silicone to seal the corners of his tabletop’s wooden frame to avoid any leaks in the future when he needs to pour the epoxy.
Preparing and Installing the Electronics

For added aesthetics, Loren installs, wires and solder his LED strip into place around the inner sides of the tabletop’s wooden frame.

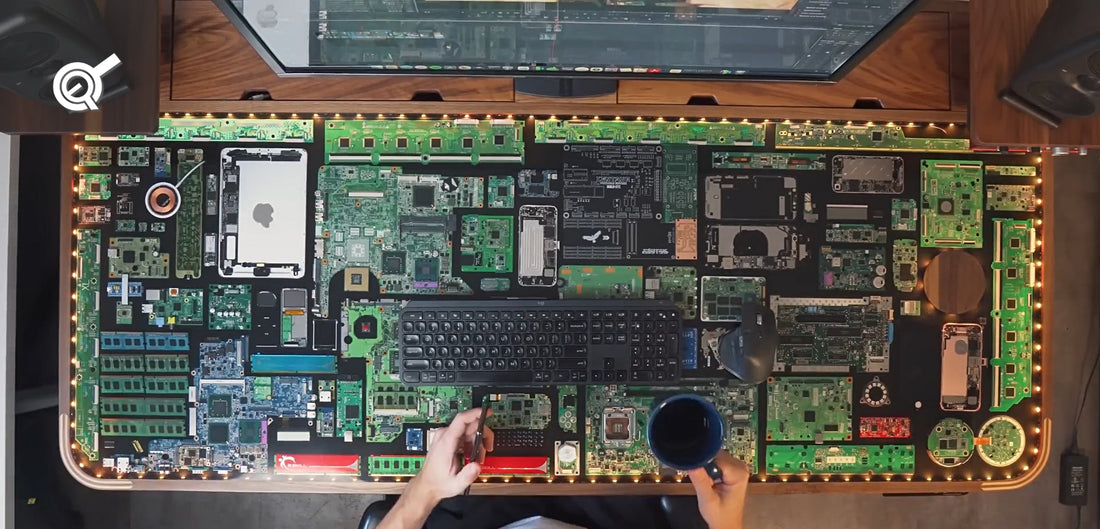
Loren was able to collect unused, broken, and abandoned electronic waste to be used for his custom tabletop. The more e-waste that can be put into the desk, the less epoxy he will have to use later. While preparing the electronics, Loren had to remove all their labels and left-over adhesives. In some cases, Loren had to modify the height of the components so that it would sit below the epoxy line.

Aside from the LEDs embedded in the epoxy, the only other working component will be his apple MagSafe wireless charger.

Originally, Loren’s plan was to have an embedded coaster sitting flush with the epoxy top that had this detailed engraving of ohm's law, however, we will later see why this detail didn't quite work out.

After checking that the tabletop platform is flat and level, Loren then places all the electronic waste into position for the next step.
Pouring The Epoxy

Loren pours a black epoxy base as the first layer before proceeding with clear epoxy to fill the rest of the tabletop. He wanted to pour the clear epoxy in one go but came up about 1 gallon short with the epoxy kit that he ordered.

Although Loren ordered more epoxy to arrive later, there was a good chance that he may have to sand in between coats the longer the epoxy sets. After five days, the top layer of epoxy had cured beyond the point of being able to pour another layer of epoxy directly over it.

Loren then scuffed up the entire top surface with sandpaper and then proceeds with pouring the final layer of clear epoxy directly over it while hoping that the scratches will disappear.
Polishing and Sanding

To order to get a nice flush and leveled surface, Loren had to sand and polish the final layer of epoxy.
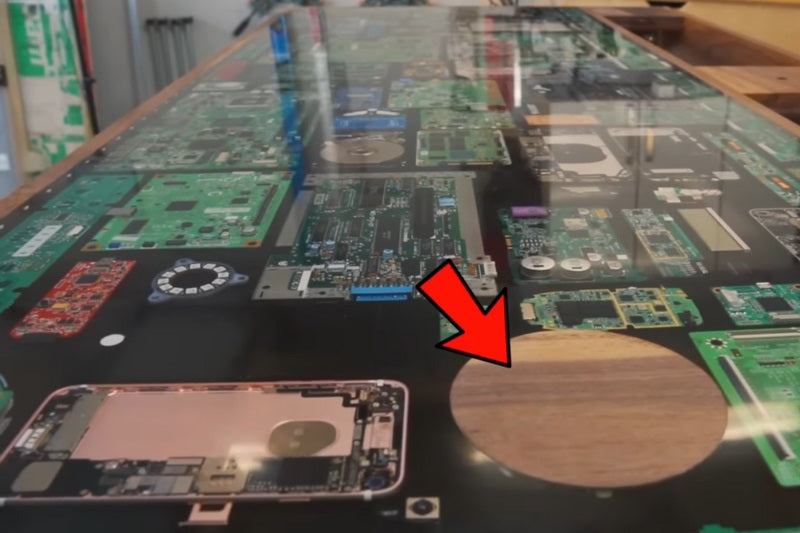
This had resulted in having to sand through the details on his coaster, however, it still ended up with a cool appearance.

After completely polishing and sanding the epoxy layer, Loren realized that he placed his dowel too close to the surface on the tabletop corner.

Wood fillers were not very aesthetic, so Loren decided to use two pieces of Maple which he had cut out and inlay them to make the mistake appear a little more intentional. After the Maple pieces were glued and chiseled into shape, Loren sands it down to a flush level. Unintentional mistakes such as these can sometimes end up being transformed into an opportunity that turns into something better.
Computer Mount

For the making of Loren’s under-desk computer mount, he cuts out the pieces he will need from steel angle bars. These cut-out pieces of steel are then covered with black coating.
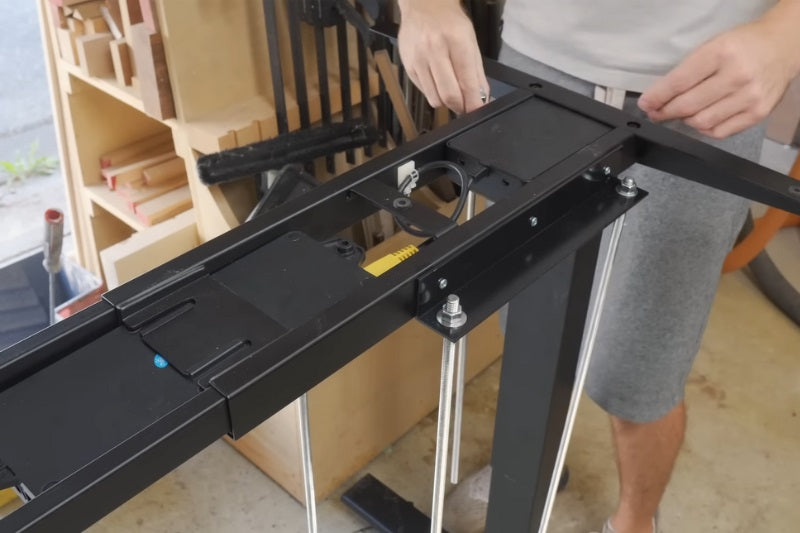
These under-desk computer mount pieces are then secured with screws to the framing of Loren’s standing desk base. Long lead screws are placed on the four corners which will later be used as to support the base of Loren’s CPU holder.

Loren then secures the rest of his working electronic components and drawer slides to go underneath the tabletop. The metal drawer slides will later be used as part of his custom drawers for storage.
Dovetail Shelves

After doing a practice joint for his hand-cut dovetails, Loren then proceeds with making the dovetail shelves for his workstation. He uses a coping saw and Japanese hand saw to carefully make his wooden cuts. These dovetail shelve pieces are then glued and clamped together securely.

Once the glue has dried, Loren places the dovetail shelves on the left and right sides of his custom tabletop. He then screws the dovetail shelves securely into place.
Final Touches

For the final touches, Loren installs his single monitor stand and printed up the black bottom covers for his wooden bottom CPU mount. He also installed his wooden storage drawer, added some final accessories, and completed all the cabling for the final installation.

Our black DA-13 Headphone Hanger was attached to the bottom of Loren’s tabletop to conveniently store his headphones.

Keeping the cables organized underneath Loren’s DIY adjustable standing desk was made easy thanks to our cable management solutions and DO-01-White cable snake.
The Result
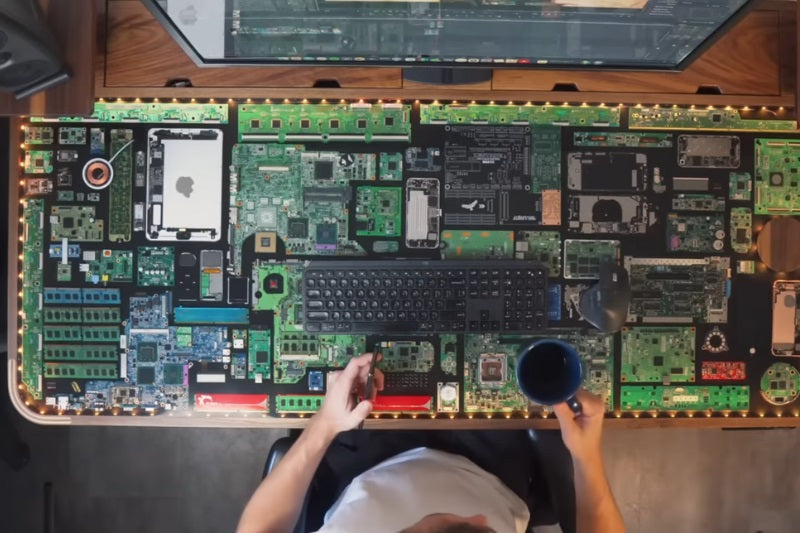
The LEDs embedded in the epoxy can be a bit much in their more complex modes, but when paired with the Govi app, it offers a lot more flexibility. Loren has set two timers so that the LEDs on his DIY adjustable standing desk are on only during his work shift. This lets him know when it's time to take a break or when it's time to end his working shift.
One reported issue Loren was worried about was the wobble of standing desks, however, it hasn't been noticeable during his regular daily use. It should be noted that the setup can wobble if the user was trying to rock the setup back and forth intentionally. The caster wheels he installed were also convenient and very helpful when Loren needs to get behind the desk to do any cabling. The nut inserts that fasten the wheels to the frame can become loose, however, Loren thinks he is over the weight restriction of the product. After adding his computer, monitor, and speakers, along with the rest of his workstation supplies, the Solo Ryzer frame still doesn't seem to be stressed or struggling at all with the weight applied.
IN SUMMARY
By following a few steps and using the right supplies, Loren now has his very own DIY adjustable standing desk from trashed electronics! His custom tabletop combined with our adjustable legs for desks allows Loren to conveniently change the working height of his DREAM DESK at any given time. For more cool projects by Loren, feel free to visit his Youtube channel!
Thank you to Loren for sharing your project - We are delighted to see you enjoying your new DIY adjustable standing desk!
If you have any queries about our desks or were interested in sharing your custom project ideas, feel free to reach out to us! Our team of representatives is experts in what we do and will be happy to help with any questions you may have!
sales@progressivedesk.com | 1-800-828-9414